Previous less-than-friendly interactions between NATO and Syrian forces on the hogbacks of the desert made me acutely sensible of the dangers lurking around every dune while bomb defusing, compound raiding, insurgent hunting and all other desert related olympic sports.
Tucked away rebels packing soviet-era automatic roscoe’s-47, well placed man-carried cannonry amongst dead-ends and alleyways and syrian agitators concealed between civilians made sure that Al-Amarah won’t soon be forgotten by those in charge (mainly me, myself and I).
The battle for Al-Amarah- while considered by the Office (my, myself and I) as a clear tactical victory during the first days of the war- was painted by those pesky journalists as a colossal military blunder when a US mechanized force lost nearly a third of its fighting force, wasting 9 lives and injuring 21 others. A post-mortem analysis of the scrimmage confirms that severe tactical mistakes were made: bad positioning, an over-reliance on superior equipment and an overall lack of knowledge on how to engage a foe that can ensconce itself under your nose ultimately spelt disaster for those unlucky 30.
When I heard I had to command a Canadian sortie tasked with breaking in and secure a bomb-building compound in northern-syria against unconventional enemy forces I knew time was upon me to put the 20 in my hindsight. The situation goes as follows:
Local anti-NATO Demonstrations in Safa, Ta’ll Birak, and Al Hasakah have turned to violence in the countryside. Roadside bombs and ambushed along Route 7 have increased in frequency. Last night an ambush near a small hill of tall Sara and the road to Al Qamishli claimed the lives of two NGO aid workers. A Canadian force has been sent to search a small machine shop that is a suspected bomb factory, and a small olive grove that intel says may be a terrorist stronghold. Your mission is to capture the suspected bomb factory and the olive grove. Destroy any enemy resistance encountered while minimizing your own casualties.
The Rambo-like plan of “let’s catch ’em at first light. We’ll make a lot of noise, blow hell out of that machine shop” strikes me as suspiciously naive and I’m not sure that “a G-Wagon drive-by” is part of NATO battle doctrine. Given the reports that route 7 was recently the stage for another ambush just hours prior a concoct with less sassy and a couple more brain cells are a hard requirements. Have in mind that reinforcements are expected and the starting forces comprised of a dozen valiant canadians in their lightly armoured mud runners can’t take two compounds by themselves with no clear intel of what they could be facing. So the HQ in the ground searches for a solution and this is what they came up with.

Orange lines- Suspected syrian locations
Blue lines- Desired friendly troops positioning for a simultaneous assault on both compounds
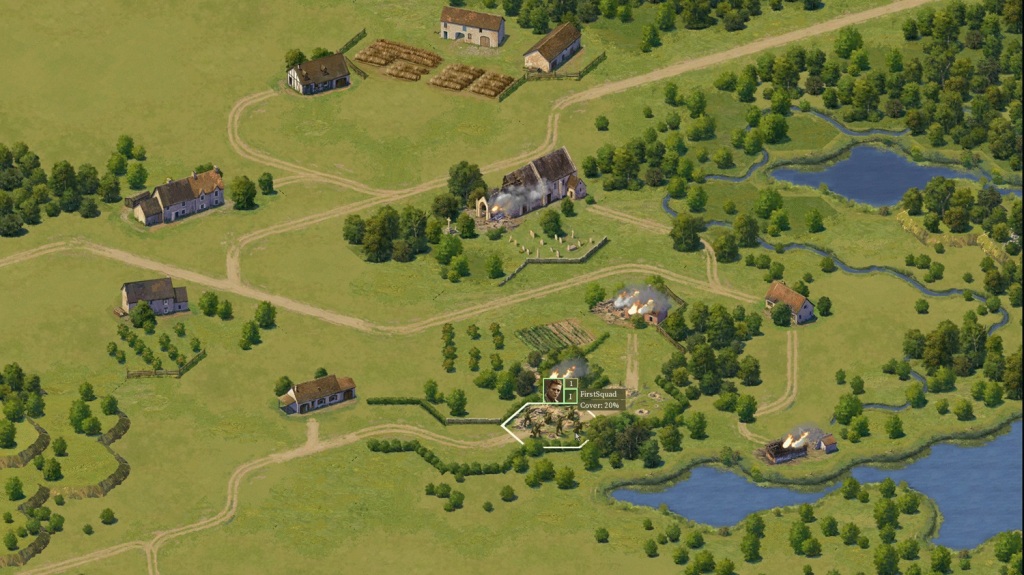
The first 4 G-Wagons arrive via the infamous route 7 and the first step is to dismount and to setup a temporary base of operations that can do three things. The first is to create a strong point from which to launch probing teams so that they can both scout with a clear line of retreat if needed. The second is oversee the 7th to make sure that future reinforcements coming down the road won’t be met with less amicable faces. The third and final reasoning behind this is to create a clear position from where all the nice canadians will strike.

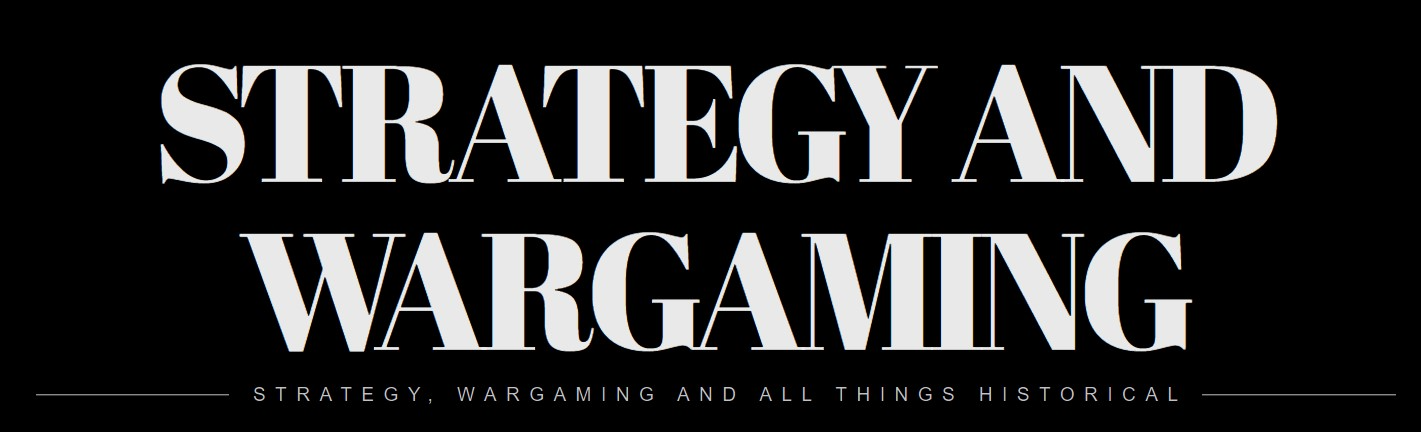
You would be surprised to know how important it is- in the modern battlefield- to find the enemy first before he lands an eye on you. Seeing is killing. The idea now is rather simple: scout safely and establish some forward observation points to identify and mark targets. Gain terrain and line of sight advantage. Cover the maximum ground possible under cover, avoid all and any unnecessary contacts, if possible don’t be detected until we see the white in their eyes. Scout sections should be spread out from each other as it remains rather unclear if the enemy is equipped with mortars or other less affectionate methods of showing their canadian friends a warm welcome. Even so it’s very likely that someone, somewhere has a rocket propelled grenade laying around willing to cause some consternation to those getting too comfortable under the blistering sun in the jordanian steppe.

All but the HQ section and one scout squad begin rolling out in a slow and methodical fashion across the barren lands sprinkled with salsola vermiculata. The sniper team went up the road followed by those pesky golden hamsters, always under the cover of nearby ridges and accompanied by a G-Wagon in case any suspicious looking bedouin herdsmen with no herd but an AK was spotted. Quick positioning was quintessential in the early moments. Those of you that might be wondering why didn’t I just trucked them along the Fertile Crescent would be in for a rude awakening the moment the hummocks started shouted in Arabic. Unlike most games of the genre, CMSF2 and its Badia desert are harsh mistresses, if your troops are the first on the enemy sights things tend to go south rather fast.

A scout team with a light machine gun setup position along the ridge near route 7 that gives them full control from the east of the suspected factory all the way across the road to the west and the plains beyond. The other assailants started to surround the suspected factory from the south with 3 of them focusing their sights on it and one peeking left just to make sure enemies coming from northeast wouldn’t have an easy sweep.

When the nice herdsmen we met a while back whose favorite hobbies revolved around petting cute golden hamsters and feeding orphan camels struck everybody as odd when they all spotted him aiming a saturday-night special at us in that suspiciously intimidating camouflage with jeans attire. The whizzing cracks that follows the bam of a Dragunov seem to indicate that this bomb-making workshop is now on high alert.
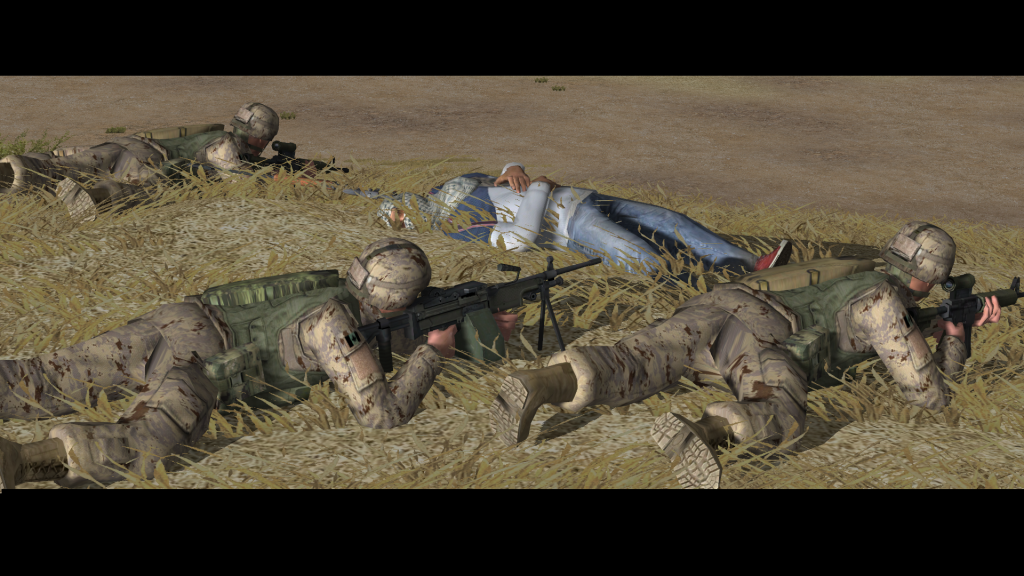
Section leader Recce makes the right call when he decides to call in for some mortars as a way to make sure no wannabe creative bomb maker wishes to venture outside for the next ten to twenty minutes. Concentrated firepower has always being a staple of my wargaming experience. If my guys go fully loaded into battle I expect them to comeback way lighter after dumping the maximum amount possible of slugs, rounds and rockets in the enemy general direction. There is no point in saving 100 rounds of ammunition or another air-strike if there’s no one to either shoot them or call for them. Compound mud walls shake with the mortar blasts but not before the Dragunov fatally shoots one member of the 3rd Section HQ. The sniper is forced back inside but the score is null to one. As soon as the shelling comes to an halt the LAVs arrive.

Firepower is now the defining word that will dominate and set the terms for engagement. Even after the mortars have gone silent, all teams are ordered to suppress the insurgent factory to keep them pinned inside while the LAVs unload and take positions.

Two atop Sara Hill aim to control the stronghold and the olive garden where more insurgents are suspected to be playing hide’n’seek. The engineer squads rush to the enemy sniper on the hill and take him out. A LAV between the hill and the compound makes sure that all angles are covered and a large force of enemy attackers is spotted rushing in to join the struggle.
The 4th Infantry Section Carrier 25mm HE rounds and 7.62mm light machine gun fire turned men into mince meat. At least nine are confirmed enemy casualties.


At the same time this is happening the scout team joined forces with their freshly arrived comrades and rushed towards the compound blowing the northern wall to force an entry in a futile attempt to avoid any possible encounters from the south. Even after countless smoke screens, heavy suppressive fire and a sniper overlooking the plains one bastard stood up from behind a very small crevice and shot 2 of my men before they could put him down.

The single man inside the compound happens to the be sole sniper we tried to swab back inside early. He is creeping around in the same building, takes a couple of pot-shots from the windows before an entire squad opens up on him and ultimately shoot him down. An engineer team and a scout team rush to search and secure all the buildings before setting themselves up in a position to help support the final assault at the enemy stronghold in the upper right corner of the map.

With the factory secured, the valley under control and all enemies either flushed out or eliminated on the hill it is decided that- due to a relatively high number of bluefor casualties- all precautions should be taken and I give the order to shell the stronghold with another mortar barrage, to raze the mud buildings with the HE rounds of our AFVs and to spray to olive garden where some contacts had been spotted earlier by the supporting sniper team.

The engineer squads don’t hold back and take aim from their advantageous position in the high ground.

In a futile attemp to fight back an already lost battle the UnForces all across the western side try-very unsucessfully- to land some long range shots and are soon met by the eagle-eyed sniper team whose trigger finger has been itching for some action since the battle has begun.

A couple minutes later the battle has ended with an unconventional surrender and a Total Victory for the Canadian Army with both Victory locations being secured (one of the them completely destroyed). Fifty insurgents lost their lives that day with 17 being lightly or severely wounded. The canadians have lost 7 lives, a high price to pay for what can be considered a small scale skirmish with no palpable strategic importance in the grand-scheme of things. The media are going to have a field day once more.


Follow Strategy and Wargaming Socials
If you enjoy Strategy and Wargaming, then you need to follow its socials. Are we the best strategy gaming website around? I would say so. Heck, what other options do you have? The Wargamer? Please.
So why not give us a follow on the cesspool that is Twitter, or join the 1000 other geriatric patients on Facebook? Or subscribe down below? Or maybe do everything? I don’t care, I’m not your grandmother.
If you enjoyed the article, consider buying me a coffee!
I’ve been running Strategy and Wargaming at my own expense since 2017, with only the ad revenue to cover the hosting, with everything else being done by me. So, if you’re an avid reader, you can afford it, and want to support the website, please consider Buying Me a Coffee by clicking this link, for as low as one euro! If you do, just know that you’re helping out a lot and contributing so that Strategy and Wargaming can continue growing!


Leave a comment